Antenna Mast Mounts for Wall, Roof and Base
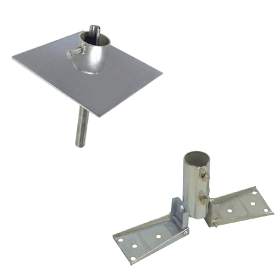
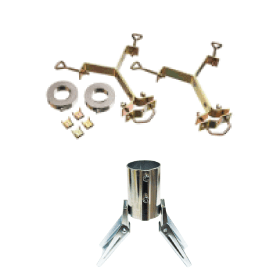
Antenna Mast Ground Base Mounts
Ground Level Base Mounts for Antenna Mast Poles typically provide for a Plate style Platform upon which will rest Antenna Mast and/or Telescopic Mast Poles of varying Outside Diameters, designed to take the weight and downward pressure of Down Guy Wires, Antenna Weight, Wind Load and the Mast itself and distribute/transfer to the foundation, pad, or soil. Being at ground level, it is important to elevate the surface upon which the plate will rest in comparison to surrounding grade as not to pool water and acids that would promote rust. The Plates typically come with a separate Stake which will fixate the plate to keep it from drifting. The stake can be driven into a foundation of gravel or concrete (better) and if integrally attached, can be direct embed into the soil itself for temporary fixtures.
The economy grade plates simply have the stake coming up through a center hole (about an inch) and the hollow mast tube rests on the plate covering this stake. As the stake and the Mast Tube will be of differing diameters, there is some rotational play as the Down Guy Wires provide the only means of securement and fixation. Premium Grade Base Plates will have a integral steel tube collar with set screws which will fixate and secure the mast in addition to the force of the Down Guy Wires. The base plates can be used in bracketed installations of One piece Mast Tubes or Telescopic Antenna Masts however; Manufacturers recommend that masts that rise 10 feet or more above the last bracket or guy level, should be guyed at this level also to keep from folding over in the wind.
Antenna Mast Roof Base Mounts
Roof Base Mounts for Antenna Mast Poles are not centered upon a stake or fixated solely by the Down Guy Wires (keeping in mind there is no wall to bracket to) and therefore require a mechanical connection through the shingles, tiles, etc., past the vapor and weatherproof barriers to the structural load-bearing components that lay beneath. This attachment is usually made by means of lag screws and the watertight barrier is sealed with a pitch-pad between the base and shingle in which the lag screw will perforate and fixate.
Most Roof Mounts for Antenna Mast Poles these days are flexible enough to accommodate mounting on a Flat, Pitched or Peaked Roof location. Imagine a cup with two double jointed hinged feet with one on each side and you get the idea. This allows for the Antenna, Antenna Mast and Down Guy Wires to all be lowered and raised together even after the base mount being secured to the roof. The Universal style Cups may actually be a clam with two pieces squeezing the bottom of the mast pole via screws that draw to two pieces together. The cup style may come in a variety of diameters to accommodate a specific range of mast sizes then secured by set screws. It is important to note that as in the case of the Ground Base Mounts, No Base is "Freestanding" or "Self-Supporting" and rely on a combination of brackets and down guy wires to keep the mast pole in place and the antenna on target. The down guy wires then have to attach to another structural load-bearing component of the roof at several locations by means of round-eye lags, bolts and screws. The Pattern of down guys is 3 or 4 way. 3 way mostly used on the ground with 4 way mostly used on home roofs with a guy going to each corner.
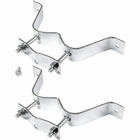
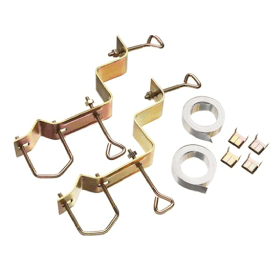
Antenna Mast Wall Mount Brackets
Antenna Mast Wall Mount Brackets for Off-air and OTA TV, UHF/VHF Radio, Remote Telemetry Control and Monitoring Stations, Cellular Date Gateways, WiFi, Wireless Internet, Receivers, Boosters and Repeaters.
From Sets of Heavy Duty "W" Style Brackets with Hardware Included to "Y" Styles Brackets for Standoffs from the Wall of 2 to 24 inches Supporting Light to Medium Duty Antennas on Mast Poles from 5 to 10 feet long and from 1.00 to 3.00 inches in Outside Diameter.
These mast mountings are typical and generally require the cantilever distance between the mounts be one quarter (1/4) to one third (1/3) of the mast length depending on Wind Load, starting from the bottom with 2 foot between brackets being a minimum distance. All Masts greater than ten feet in length, and/or 2 inches or greater in O.D. should be based upon and from the ground in rising up to the desired height.
Also for Telescopic Mast Poles comprised of 1.25", 1.50", 1.75", 2.00" and 2.25" Tubes nested together and then extended, these wall mounts can supplement structural support but are not designed to take the place of a Base in Supporting the weight of the Mast off the ground or guying. Be sure and check that the Tube segments you wish to wall mount will fit within the Outside Diameter Window specified that the Brackets will accommodate. Set screw installation may require some field drilling.
Manufacturers recommend that ALL masts above 10 feet from their uppermost support be Guyed.
With more height in your installation, Grounding/Bonding is a recommended consideration.
It is Important to choose an Antenna Mast Mount and Wall Mounting Location with an eye on the Finished Antenna Installation in Mind. Be Sure to First select a location that lends itself to applying a Vertical, Cantilevered, Twisting Load without Compromising the Integrity of the Wall Material you affix to. Most Modern Exterior Decorative Wall Finishes most often do not have the Strength to Hold the Weight and Pressure of a Large TV Antenna under Wind Load without fail. Beams and Studs within the Wall are an Absolute Must to Locate when the Wall Composition is anything other than Solid wood or Concrete. Attach to these Strength Members. Further, Think about what's underneath the Wall exterior. Is it stronger, will it yield to Pressure over time as well? Sandwich additional Material (wood or steel) to the backside or both sides of the wall at the points where the mount attaches, as to distribute the load on relatively weak wall materials and to dampen vibration from Wind. Weather Proof the Installation to Maintain the Integrity of your Home. Next consider the Location over a Lifetime of Adjustments, does it lend itself to modifications in Height or Direction? Larger Antennas increase the surface area presented to air movement, Hence, Wind-load does increase. As the length of the mast increases from Its last attached point on the structure, the torque applied also increases with Weight and Wind-Load, requiring a more substantive attachment and Load-Bearing material. Keep the Distance Minimal from the Antenna to the TV's and Equipment you feed, as to minimize loss and the need for Amplification. Further, the NEC (National Electrical Code partly defines a good Ground connection as being as short as possible, you must affix a connection to a good Earth Ground prior to Premise entry or Bond to an existing one.
Antenna Mast Chimney Mounts
These Mounts are used more frequently than other types of mounts, but they often are not the best option. Although they are relatively easy to install, the smoke and gases from a chimney can shorten the life of the antenna and significantly impair its performance. A chimney installation is practical only if the chimney is sturdy and vertical. Never mount an antenna on a deteriorated chimney. During moderate to high winds, an un-guyed mast taller than 10 feet can exert enough leverage to break off an unstable chimney. If you choose a chimney mount, use enough mast to place the antenna above most of the smoke and gases. However, to avoid overstressing the chimney, do not mount the antenna more than 10 feet above the top of the chimney. If the height of the antenna must exceed 10 feet to receive satisfactory signals, the mast must be properly guyed. Securing the chimney-mounted antenna and minimizing the stress on the chimney requires the mounting straps to be properly spaced. The top strap should be placed as high up on the chimney as possible. If the chimney has a crown or projecting cap, place the top strap directly under it. The bottom strap should be placed 4 feet below the top strap. If the chimney isn’t long enough to permit this, place the bottom strap as far down on the chimney as possible. If the mast must be 10 feet above the chimney top, don’t use a chimney mount unless you can space the straps at least 30 inches apart. For masts less than 10 feet above the chimney top, the straps should be spaced no less than 24 inches apart. Assemble one end of each strap to one eyebolt using a strap clamp (See Spec sheet). Attach the eyebolt/strap assemblies to each bracket (See Spec sheet). Insert an eyebolt into the other end of each bracket. The nuts on each eyebolt should only be threaded about ½” onto the eyebolts. Run the straps around the chimney. Be sure the straps are level, with no kinks or twists. Due to uneven Decorative Brick, you may need to place a rounded corner aluminum angle (or wood) between the strap and the brick to keep from damaging the brick or the strap. The easiest way to level straps is to line them up along the nearest course of bricks. Straps should be centered on the bricks – not over the mortar joint. Feed the free end of each strap through an eyebolt on the other end of each bracket. Pull each strap tight, line it up so that it is level, and then tighten it just enough to hold it in place. Before the straps are tightened completely, fasten the mast to the mounting bracket. (It is assumed that the antenna has already been clamped securely to the mast, and one end of the transmission line has been connected to the antenna terminals.) Align the mast so that it is vertical. Then completely tighten the mounting straps. Next, orient the antenna. Finally, tighten the clamps that hold the mast to the mounting. Be sure the clamps are tight enough to prevent the mast from being rotated by the wind load on the antenna.
Mounting Location
It is Important to choose a Mount and Mounting Location with a Picture of the Finished Installation in Mind. Be Sure to First select a location that lends itself to applying a Load without Compromising the Integrity of the Material you affix to. Most Decorative Finishes most often do not have the Strength to Hold a Weight or Pressure without fail. Further, Think about what's underneath the exterior. Is it stronger, or will it yield to Pressure over time also? Weather Proof the Installation to Maintain the Integrity of your Home. Next consider the Location over a Lifetime of Adjustments, does it lend itself to modifications in Height or Direction? Larger Antennas increase the surface area presented to air movement, Hence, Wind-load does increase. As the length of the mast increases from Its last attached point on the structure, the torque applied in cantilever also increases with Weight and Wind-Load, requiring a more substantive attachment and Load-Bearing material. Keep the Distance Minimal from the Antenna to the TV's and Equipment you feed, as to minimize loss and the need for Amplification.